State Machine is one of the most used design patterns for developing AI or multi-state systems, but not the best.
If your are new in game AI and NPC development, learning Finite State Machine design pattern could be a good start point.
This design pattern help you to develop your simple NPCs but if you’re gonna work on more complex NPC I will share other tutorials about advance NPC development with other architectures and design patterns like GOAP, UtilityAI, etc.
FYI: NPC is a Non-player character like enemies in video games and I do recommend you read it’s formal document in Wikipedia or watch some gameplay videos of well-known games. I personally recommend one of my favorite game Mount & Blade II: Bannerlord which AI and NPC play a big role in its mechanics and gameplay.
[State machine GitHub Repo]
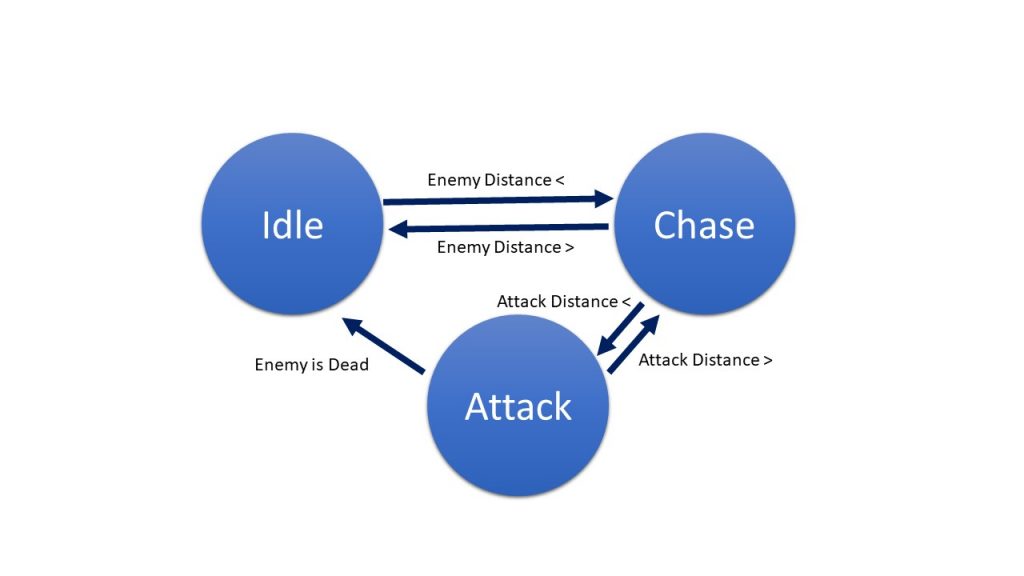
How does the state machine work?
Suppose you want to write down the behavior of an enemy bot, what behaviors are likely to occur from this enemy.
- Idle
- Patrol
- attack
- Chase
- Die
Each of these behaviors, which are named separately, is called a state. The character decides which state to transition to in different situations.
In the image below, I give an example that shows the conditions under which
How to develop a Pluggable State Machine with easy maintenance?
In this method, I have tried to package the extendable code parts in the ScriptableObject in Unity to make it customizable for NPCs and easy to update states in the Unity Editor environment.
Important Note: As you can see in the image above, each State consists of two basic parts:
- The decision-making part for transition to another State called Decision
- The main body code of State that defines the behavior(s) is called Action
Action
public abstract class IAction : ScriptableObject
{
  public abstract void Entry(StateController fsm);
  public abstract void Execute(StateController fsm);
  public abstract void Exit(StateController fsm);
}
[CreateAssetMenu(menuName = "AI/Action/Idle")]
public class ActionIdle : IAction
{
  public override void Entry(StateController fsm)
  {
     fsm.animator.SetBool("Idle", true);
  }

  public override void Execute(StateController fsm)
  {
     // fsm.animator.SetBool("Idle", true);
  }

  public override void Exit(StateController fsm)
  {
    fsm.animator.SetBool("Idle", false);
  }
}
As an example the above code simply activates the associated animation for Idle status, you may like manipulate NavMeshAgent in this part or do many things based-on your game desing.
Decision
public abstract class IDecision : ScriptableObject
{
    public abstract bool Check(StateController fsm);
}
[CreateAssetMenu(menuName = "AI/Decision/Health Point Threshold")]
 public class DecisionHPThreshold : IDecision
 {
  [Tooltip("Make decision according to current health point")]
   public int threshold;
   public override bool Check(StateController fsm)
 {
   return fsm.HP.GetHP() <= Mathf.Abs(threshold);
 }
}
In the above example, I have given one of the practical decisions in changing the State as an example. HP declares the result if the character’s Health Point is less than the desired level specified in the ScriptableObject.
But in order to be able to practically use the created Actions and Decisons in our game our desired State should execute in a personalized way, we need a state code that is generic.
But before that, let’s build a class to help us make decision-making easier for Transition so every state canmake decision easily.
[System.Serializable]
 public class Transition
 {
  public IDecision decision;
  public State TrueState;
  public State FalseState;
 }
As you can see, you do not need to write a separate script for each state. We will have a state code here that we will not change anymore. Instead, we will only create new Action and Decison according to our needs.
In this way, more development speed, less code clutter, and if you pay a little attention to the principles of SOLID, you will find that everything will be in place.
On the other hand, it will be easier for you and other coders to understand the code, and even non-programmers can also design their desired state machine based-on the list of Actions and Decisions that already developed.
[CreateAssetMenu(menuName ="AI/State")]
 public class State : ScriptableObject
{
 public IAction[] actions;
 public Transition[] transitions;
 public void Entry(StateController fsm)
{
   for (int i = 0; i < actions.Length; i++)
   { actions[i].Entry(fsm); }
}

 public void Execute(StateController fsm)
{
  for (int i = 0; i < transitions.Length; i++)
 {
  if (transitions[i].decision.Check(fsm))
   {
    fsm.ChangeState(transitions[i].TrueState);
   } else {
    fsm.ChangeState(transitions[i].FalseState);
   }
  }
  for (int i = 0; i < actions.Length; i++)
  { actions[i].Execute(fsm); }
}

public void Exit(StateController fsm)
{
  for (int i = 0; i < actions.Length; i++)
  {
    actions[i].Exit(fsm); }
  }
}